 Chinese Knot Guide
Pipa Knot Tutorial: Clockwise Loop and Stacked Wraps
Quick Answer: This tutorial follows one single-cord variation documented in J.D. Lenzen's six-step Pipa Knot sequence. Make a clockwise loop with the left cord over the right, carry the left running end around the back of that loop and down across itself, repeat the same wrap until only a small center opening remains, then insert the running end through that opening and adjust the wraps evenly.
Start with one clockwise loop
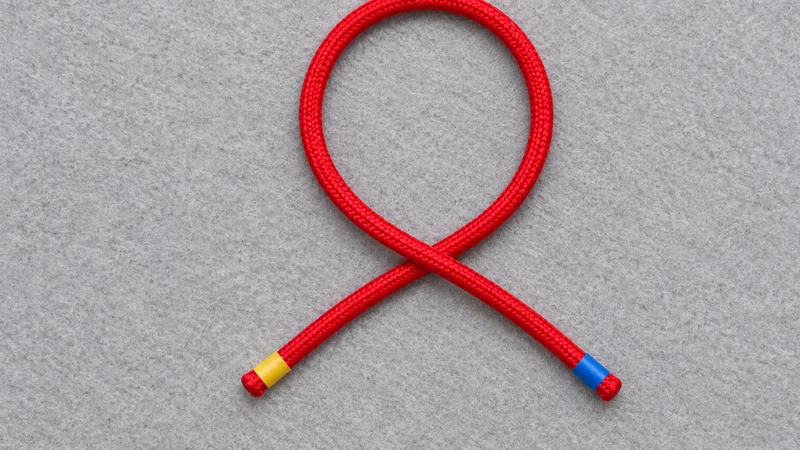
Use one continuous cord and keep both free ends visible. Form a clockwise loop so the segment coming from the left crosses over the segment on the right. Do not tighten the crossing yet; the first loop must stay open while the running end wraps around it.
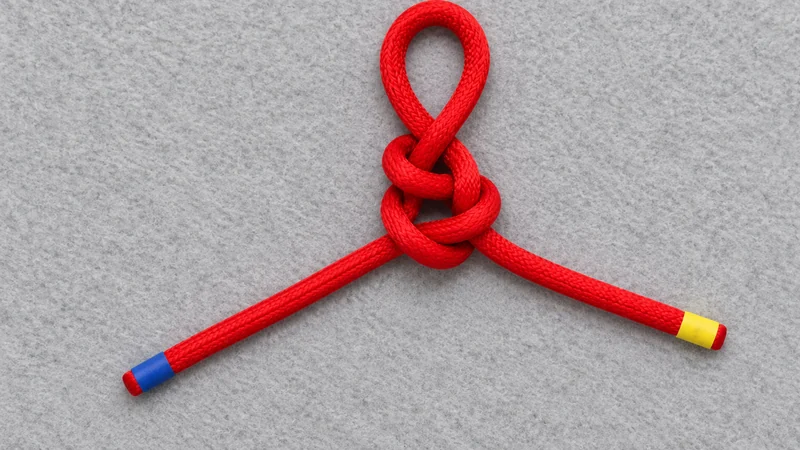
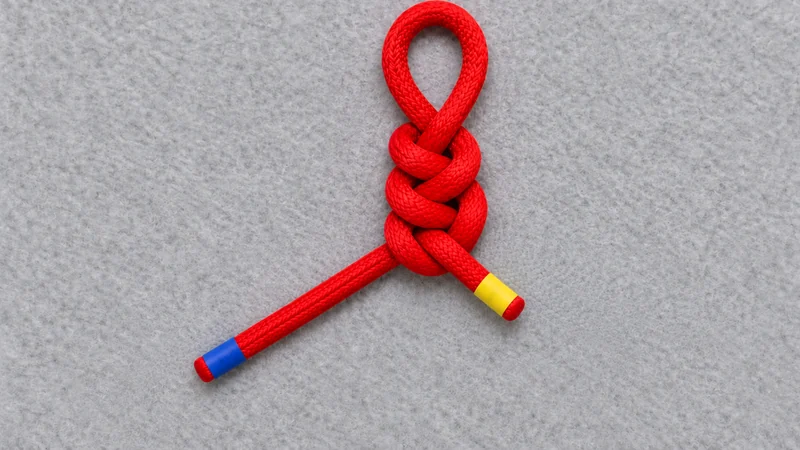
The yellow tape in these original teaching images marks the running end. The blue tape marks the other free end. The markers are not part of a finished project; they let you trace the same two ends across all three stages without guessing which strand moved.
Pipa knot route facts
- Variation
- One single-cord, repeated-wrap method
- Source sequence
- J.D. Lenzen's six-step Pipa Knot page in Decorative Fusion Knots
- First crossing
- Left cord over right in a clockwise loop
- Repeated action
- Running end travels around the back of the loop, then down across itself
- Final tuck
- Running end enters the small center peephole before the wraps are adjusted
This is one documented variation, not a universal route for every knot sold or labeled as a pipa knot. Do not mix it with a pin-board method midway through the sample. Different methods may reach a related outline while using a different order of crossings.
Carry the running end around the back
Keep the original loop in place. Lift the yellow-marked running end on the left, carry it upward around the back of the clockwise loop, and bring it down across its own segment. That movement creates the first stacked wrap below the open top loop.
Repeat the same motion without reversing direction: up around the back, then down across the previous segment. Each repetition should sit immediately below the earlier one. Keep the crossings open enough to see the route and stop if a third free end appears in a diagram or sample; one continuous cord can only have the two ends you started with.
Quick Reference: six-step route
| Step | Cord action | What must remain visible |
|---|---|---|
| 1 | Make a clockwise loop, left cord over right | One open loop and two free ends |
| 2 | Take the left running end up around the back of the loop | The original loop remains open |
| 3 | Bring that end down across its own segment | One new wrap below the top loop |
| 4 | Repeat the same back-and-down motion | Wraps stack in one direction |
| 5 | Stop when a small center peephole remains | The opening is not covered by another turn |
| 6 | Insert the running end through the peephole | The two original ends remain traceable |
The table follows the order on Lenzen's Pipa Knot page. The images here are newly created continuity references with colored end markers; they are not reproductions of the book's photographs.
Leave a peephole, tuck the end, and adjust
Continue only until the last wrap leaves a small opening at the center. Do not cover that opening with an extra loop. Guide the yellow-marked running end through the peephole, as the final source step specifies.
After the tuck, adjust rather than yank. Hold the top loop open, then move small amounts of slack through the stacked wraps in route order. Keep each wrap flat and separate. If one wrap climbs over another, loosen the affected section and restore the crossing before taking up more slack.
The Chinese knot tightening guide explains the general adjustment principle: move slack along the actual cord path instead of squeezing the whole knot into shape.
Correct a reversed wrap or a closed center
If the wraps alternate direction instead of stacking consistently, return to the first changed crossing. Do not force the final end through a shape built from a different route.
If the center closes before the final tuck, loosen the newest wrap and reopen a small peephole. Adding another turn will not solve a covered opening.
If an image or sample seems to have three free ends, stop. That is a continuity error, because this variation begins with one cord and therefore has only two ends. The colored markers in the three figures make that check explicit.
Once the component is understood, the Pipa Knot Flower lesson shows prepared pipa units used in a larger arrangement. Finish and identify the component route before combining it with other knots.
Questions about tying a pipa knot
What is a pipa knot?
It is a decorative cord knot whose stacked outline is associated with the shape of the pipa instrument. This page teaches one documented repeated-wrap variation.
Does this tutorial use a board?
No. It follows Lenzen's hand-formed six-step sequence. Board methods exist, but they use a different setup and should not be mixed into this route halfway through.
Which end moves?
The left running end moves around the back of the original loop and down across itself. In the teaching images, that end is marked yellow.
When should I stop adding wraps?
Stop while a small center peephole remains. The final step needs that opening for the running end.
How do I tighten the knot?
After the running end passes through the peephole, move small amounts of slack through the same route and keep the stacked wraps flat. Do not pull unrelated strands or hide a reversed crossing.