 Chinese Knot Guide
Snake Knot Tutorial: Two-Cord Steps and Even Tension
Quick Answer: A snake knot is a repeating two-strand craft knot. Make a loop with the left strand, pass that strand under the right and back through its own loop, then mirror the move with the right strand. Tighten those two moves as one pair before repeating. The finished chain is firm and slightly spiraled because the left and right loops alternate around each other.
For a first sample, use two contrasting cords and stop after six to eight paired cycles. The goal is not speed. It is to keep the same strand order, match the loop sizes, and remove slack before the next pair hides the previous one.
The exact snake-knot pattern used here
“Snake knot” can be used loosely across craft communities, so this tutorial fixes one variation: two working strands, one left and one right, looping through each other in turn. Knot Just Jigs describes the same sequence as left under right and back through its own loop, followed by the mirrored right-side move.
This is a decorative cord technique for short chains, lanyard details, zipper pulls, and practice samples. It is not a climbing, rescue, restraint, or load-bearing knot. The name describes the repeating appearance; this page does not assign it a universal Chinese symbolic, zodiac, religious, or luck meaning.
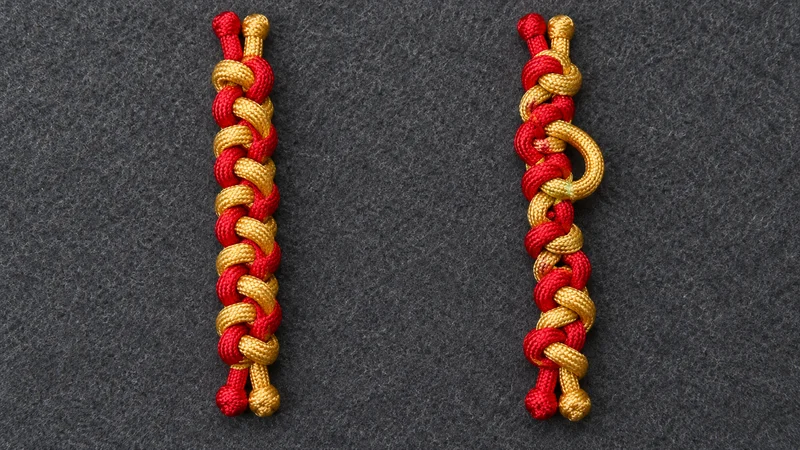
The finished pattern should show two tidy side edges and a compact center. If one color dominates the face, one loop is probably larger, the working order was reversed, or the pair was tightened unevenly.
Materials and a stable practice setup
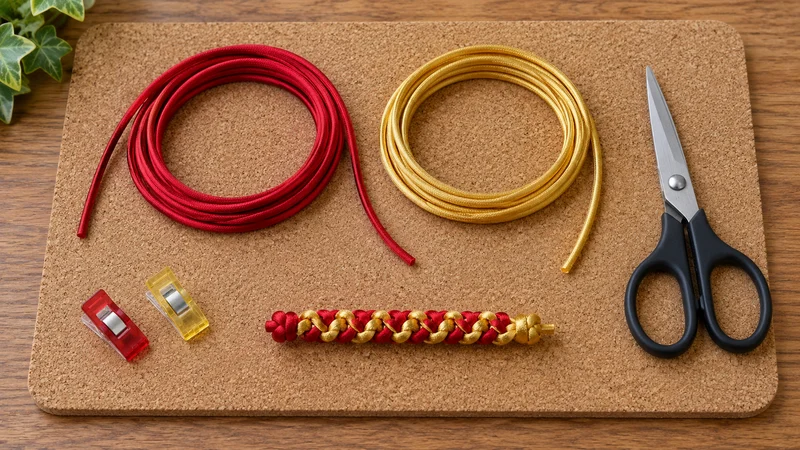
Choose two pieces of round cord with similar diameter and firmness. Red and gold are useful for learning because the colors reveal which strand made each half of the pair. Very soft yarn collapses before the path is clear; very stiff utility cord can be difficult to set without large loops. A medium, smooth craft cord is easier to inspect.
Prepare:
- two contrasting cords of equal diameter;
- a clip or removable tape to hold the starting bight;
- a flat cork or fabric-covered work surface;
- closed scissors kept aside until the sample is complete; and
- enough spare cord to make a short practice chain without joining ends.
Do not begin with final measurements. Cord use changes with diameter, stiffness, tension, and the size of each loop. Tie a short sample first, measure the cord actually consumed, then calculate the material for a project. If synthetic ends will eventually be heat-finished, follow the cord maker's safety instructions in a ventilated work area; this tutorial does not require flame or melting.
Snake-knot facts before the first pair
- Structure
- Two strands form alternating interlocked loops
- Working strands
- Left and right ends repeat as a pair
- Core action
- Each end passes under the opposite strand and back through its own loop
- Tension checkpoint
- Set both loops before starting the next pair
- Use boundary
- Decorative practice only; no load-bearing claim
- Structure: two strands form alternating interlocked loops.
- Working strands: the left and right ends repeat as a pair.
- Core action: each end passes under the opposite strand and back through its own loop.
- Tension checkpoint: set both loops before starting the next pair.
- Use boundary: decorative practice only; no load-bearing claim.
Place the starting bight at the top and let both working ends point downward. Name the red cord Left and the gold cord Right. Keep those names tied to position, not color, because the cords change which face is visible as the chain develops.
Build the first left-right pair
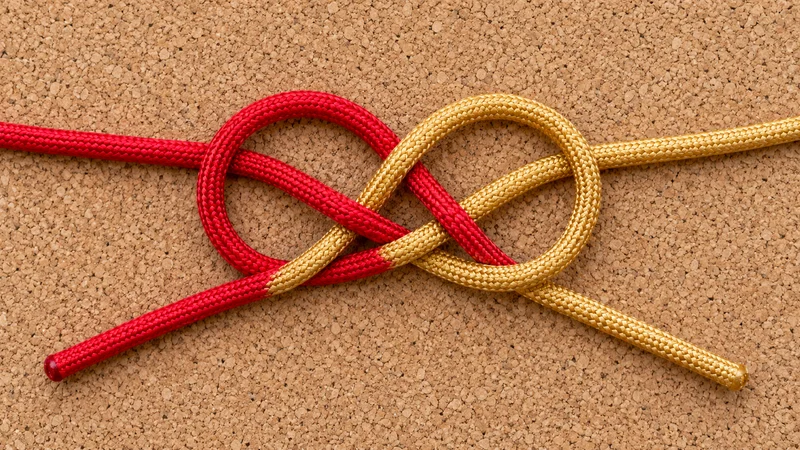
Left move. Form an open loop with the left strand. Lead its working end under the right strand, then bring that end back through the left strand's own loop. Leave the loop open enough to see the path. Do not pull it tight yet.
Right move. Mirror the setup. Form an open loop with the right strand, lead its working end under the left strand, and bring it back through the right strand's own loop. The two loops should face opposite directions and sit close to the starting bight.
Set the pair. Hold the center where the loops interlock. Pull the left and right working ends gradually, alternating small movements. Bring both loops down to similar size. The pair should close without one strand folding sharply or climbing over the edge of the other.
Knot Just Jigs emphasizes tightening each pair before beginning the next. That checkpoint matters: once another pair sits below a loose one, the trapped bulge is harder to redistribute without opening later work.
Repeat the pair without reversing the order
After the first pair is snug, reset the working ends so one lies clearly left and the other clearly right. Repeat the left move first, then the right move. The rhythm is always left loop, right loop, set the pair.
Work close to the previous pair. A large gap will not disappear simply by pulling the free ends harder; it usually tightens the newest loop while leaving slack above it. Instead, use a fingertip or blunt cord tool to move slack from the upper loop toward the working end, then set both sides again.
Turn the sample only when you intentionally need to inspect the back. Beginners often flip the work after every move and accidentally reverse the order. Keep the starting bight pointing away from you and the free ends toward you. That stable orientation makes mistakes easier to notice.
After every two pairs, compare the side edges. The same colors should alternate in a consistent rhythm. Count paired cycles, not isolated loops, when you compare length or plan a repeat.
Quick reference for every new pair
- Identify the current left and right working ends.
- Make the left loop and pass the left end under the right strand and through its own loop.
- Mirror the move with the right strand.
- Check that the two open loops are similar in size and face opposite directions.
- Tighten the pair gradually from both working ends.
- Inspect the side edges before beginning the next pair.
If you cannot point to both open loops before tightening, pause and loosen the newest move. Pulling an uncertain path tight makes diagnosis harder and can crease the cord.
Correct loose bulges, twists, and uneven edges
A bulge appears on one side. The previous pair was probably left loose. Stop immediately. Open only the newest pair, expose the loose loop above it, and move that slack toward the free end. Reset the corrected pair before retying.
The chain twists sharply. A slight spiral is normal for this pattern, but a sudden change usually means the left-right order reversed or one loop crossed. Compare the newest pair with the pair above it. The two colors should exchange positions consistently.
One edge is longer. Match loop size before applying final tension. Pulling hard on the shorter side can distort the center instead of equalizing the edge. Loosen both sides slightly, then tighten in small alternating pulls.
The cord surface looks crushed. The pair is being overtightened or the cord is too soft for the force used. The knot should be firm enough to hold its form without flattening the cord. A practice sample is useful precisely because it reveals that limit before a full project begins.
Finish a practice sample without overstating its use
For practice, stop the chain with several centimeters of free cord remaining. Secure the ends temporarily with a removable clip or tape and inspect the entire sample. Do not cut until you have decided how the sample will connect to a ring, clasp, loop, bead, or another knot.
Different projects need different endings. A zipper pull may return the strands through a hardware loop; a bracelet needs a deliberately planned closure; a decorative sample can remain unfinished for reuse. The cord project guide helps match practice to a project without implying that one finish fits every use.
If a later decorative knot needs adjustment, the tightening guide explains how to move slack through crossings instead of yanking one end. For more complex layouts, the pattern guide covers how to follow an over-under path before tightening.
Snake knot questions
Is a snake knot tied with one cord or two?
This tutorial uses two working strands. They may be two separate colors or the two ends of one folded cord, as long as there is a clear left and right end for the alternating sequence.
Why does my snake knot twist or bulge?
A slight spiral is normal. A sharp twist or isolated bulge usually comes from reversing the left-right order, crossing a loop, or leaving one paired cycle loose before adding the next.
Should I tighten each loop separately?
Form the left and right loops first, then set them as a pair with small alternating pulls. Fully tightening one side before checking the other can create an uneven edge.
What cord is easiest for snake-knot practice?
Use two smooth round cords of equal diameter and moderate firmness. Contrasting colors make the path easier to inspect. Avoid very fuzzy yarn or very stiff utility cord for the first sample.
Is a snake knot a safety or load-bearing knot?
No such claim is made here. Treat this as a decorative craft knot. Do not use this tutorial for climbing, rescue, restraint, fall protection, or any application where failure could cause injury.
The durable skill is not memorizing a fast hand motion. It is seeing the paired loops, preserving left-right order, and correcting slack before the next cycle hides it. Once a short sample stays even, measure that sample and plan the final project from real cord use rather than a universal estimate.